Total Pageviews

Saturday, May 8, 2010

Hack CD Protection!!!!


In the previous article, "Trick Penetrating the Web Filter (Engineering pseudonym)." I anticipate a little sharing of sites in blockir using NotePad simple tool and Google Translate. This article I will discuss a bit about the CD Hacking Protector. Before that, I apologize to the parties who feel disadvantaged, this article is purely for the sake of science pengetahuan.Tidak needed tool in this technique, only a little accuracy.

It happened about four years ago, when it was a friend to buy some fruit Interactive CD on computer applications such as Photoshop tutorials, Corel Draw, AutoCAD, etc.. The plan will double CD he is for his students at an educational institution. But the barriers are, in a CD box there is a red X symbol reads ... .. STOP PIRACY ... This CD can not be on the double!

Become a challenge for me to be able to learn the basic concepts of protecting those used by the publisher of the CD Tutorial. After trying several times it turns out the CD can not be copied.

Finally, I tried by sorting the folders contained in the CD. The result, only the folders that contain video tutorials that can not be a copy. Then I try to check the video folder to look for irregularities that may assist me in completing this mission. Sure enough, from all video files that exist, there is a strange file name (no no singkron files with other files: ex: 1.1, 1.2, ... .. 1.10,1.16). Among the rows of the file there is a file that is not sequentially (eg: 1:16). It turned out that in fact this is the file that makes the CD can not be copied. So the solution, choose all video files except the files suspected of file protection. The result, I can enjoy a variety of tutorials for FREE !!!!!!!


A little explanation: The technique used by some CD Application Protector is to include a fake file (file false) that if executed (opened or copied) to make the PC hangs. Because the process involves reading a copy of all the elements involved in the CD, then when reading the fake files PC will report an error or even hang. With the technique chosen (selecting Technique) CD ROM will only read the selected files without accessing the fake files.

How to Remove Windows XP Notification Gallery


Apparently the workers Micr0soft not just take blind salary alone. That could prove one of them with their working files that block access. Reg fee that is "weird" in the Windows XP registry.

I still remember with a tutorial on making Windows XP Tricks Gallery became the Original? When these files. Reg that I give can not be run again, and for those who have to apply these tricks, you must have the current windows are detected as a pirated windows, but you do not need to worry, because you still can update your windows and you also can remove windows genuine victim notification that appears on logon, logoff, and your windows background.

This tutorial bro requested by Johannes at the comments here. And the way is as follows!

How to remove windows genuine victim logo on the desktop background:
1.   Click Ctrl + Alt + Delete on your keyboard.
2.   Select the tab "Processes"
3.   Search writing WgaTray.exe, then right click, select "end process", then select yes.
4.   Open your Windows Explorer.
5.   Open the path "C: \ Windows \ System32".
6.   Find the file "WgaTray.exe"
7.   Right click on the file, then rename to "WgaTray1.exe"
8.   Now you can change the background image on your desktop.

How to remove windows genuine victim notification on logon and logout of Windows XP:
1.   Click the Start button, then select Run.
2.   Type in "regedit" without quotes, then click the OK button.
3.   after the new window pops up, go to this path: "HKEY_LOCAL_MACHINE \ SOFTWARE \ Microsoft \ 4.   Windows NT \ Current Version \ Winlogon \ Notify \"
5.   Delete the folder "wgalogon" and its contents.
6.   Restart your Windows and see the difference

Thursday, May 6, 2010

Setting Print Server with USB Printer DP300U DLINK


If we have a USB Printer Sharing and Client for all the others, and if the OS of the PC that provides sharing of this printer is Windows XP so that other users will be connected only dedicated to the 10 other PC Client (unless the file PACTH TCP-IP her, it violates the EULA of Windows XP tablets). Obviously this will bother us, not to mention if the PC is experiencing problems, got the virus, restart, and the others then other users will be disrupted.

So ... if there is an easy, why look for that hard? We can use the Print Server, looks like a ADSL modem or similar 8 Port Switch. One example is the Brand DLINK DP200U type. Shape as below:

Technical installation is also not hard, like the picture below.
We did manage the Print Server through a Web browser like the picture below:

I'm not too much of a description of steps - steps that we do, just follow step by step like the captured image below. Very clearly ... "The picture that represents a million words ...". If there are less obvious things, you can give the question in a comment below ...

Friday, April 30, 2010

Making connections in Windows XP VPN Client

In this article I will explain step or Step by Step VPN Client to make connections in Windows XP OS (Windows 2000, Windows Vista, Windows 7, Windows 2003 Server, etc. more or less the same).
Step One: Go to Control Panel, then select Network Connection.

Second: Then we click on "New Connections Wizard" or click "File" menu and select "New Connection". Then after the show like the picture below, click on Next.

Third: Then we select Connect to the network at my workplace. Then click Next.  

Fourth: Click the Virtual Private Network Connection and click Next.

Five: Give us a name for this VPN connection, such as the XPS-2010 or you at will. Then we click Next.

Sixth: In this stage, we select "Do not dial the initial connection" and then click Next. (If Internet access Unlimited / out in this way, but if your internet access per-him-up connection of course you can customize to your internet access).

Seventh: Next we enter the IP address of our VPN server, can be a Host Name or IP Public him, for example: 125.164.75.150.

Eight: Create a VPN connection process has been completed and we click the Host Name or IP Finish.ma Public him, for example: 125.164.75.150.

The nine: Once you click Finish, the dialog will display the city below. For the first time, we go into the Properties menu first.

On the General Tab menu, looked IP VPN Server that will connect us.

Tenth: Click menu Security Tab, then uncheck "Require Data Encription". Because we do not turn this feature on Mikrotik VPN server which we have previously installed.

Eleventh: Next we KLI Menu Tab Networking. In the Type of VPN choices we select PPTP VPN. Then to his IP address we have automatic settings, so do not need the settings again. Next we click OK and ready to make a VPN connection.

NB: ... explanation is very special for you to understand (see image below). In the menu of Internet Protocol / TCP-IP and then we click then we click Advanced Properties. Well then there's the option to Use Remote Network Gateway. Now if we switch on / we check if our PC is then connected to the VPN Gateway that we need to take a VPN Gateway Server. And vice versa and this can we prove it or we track using tracert from CMD.
For instance before connecting to the VPN Server, PC we use the ISP connection Nusanet then we check with the command tracert yahoo.com then we use the Gateway visible through the access point Nusanet. Next we Connect to Server VPN using Telkom Speedy ISP, so when we check again with the command tracert yahoo.com yahoo.com address to access the connection to the access point has not passed Nusanet but through an access point Speedy. (Well, the concept of Forward Routing using the VPN as this is what many used to speed up Internet access via alternative routes).


Eleventh: Setting VPN Connection to client we're ready, we then click Connect.

Furthermore, we will see the Connecting via register / check authentication to the VPN Server.

Then after a successful authentication, the VPN Connection Status will appear to us as shown below.

And if we look at properties such connections will be seen below, the IP Address obtained (192.168.88.20) from the IP Pool that we make in Mikrotik VPN Server. While the IP address 192.168.88.250 is an IP Gateway or IP communication server for VPN Client with Mikrotik and done Interconnect with another client.

Twelfth: We have been connected with the VPN server and then can check to IP Ping other existing client in a network with Mikrotik Network (Client PC in the office network), including for access to all resources in the LAN network. Good for accessing the Websites / peripherals networking, accessing the Folder Sharing, Printer Sharing, Email Server Intranet, or use Remote Desktop, etc..

Furthermore, in the image above and below is the capture and process monitoring VPN Client connection status.

Real Action actually do alias practice much easier than just reading the theory. My advice is diligent-rajinlah reading, including various articles I read this many times and in error.                 

Setting Network Printer with HP Install Network Printer Wizard

Although not too many users Network Printer / Printer with network connection (do not use USB or LPT1), because generally the user or owner of the Network Printer is the only big company (sich expensive ...). Though the current price is already cheap Network Printer so that next time we would prefer to use the Network Printer, Network Printer is because with more simple or easier and more practical than the USB Printer Sharing in general. For a network printer can be enabled / used by all Client PCs on the network without a PC that must be constantly alive to set the printer sharing service.

HP Network printer brands, there is usually a code "N" series rear of the printer means "NETWORK". For example HP LaserJet 4200N, HP LaserJet 2420N, HP Colour LaserJet 3600N, HP Colour LaserJet 5550N, etc.. Interface that is used on the HP printer is the HP JetDirect Network which is usually already built in in the Network Printer or a form module / card is plugged in the socket slot.

In addition to the HP Printer Network, we can also use a USB printer or LPT1 us into a network printer using a print server (there is a wireless printer server also loh). For example would I make in the next article Printer Server is using DLINK type DP300U brand.

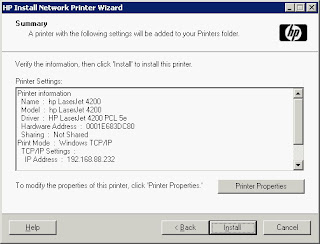
Okay so ... is if we start setting technique using HP Install Network Printer Network Printer Wizard. This technique helps us in configuring a network printer quickly and easily.

Step One: Download the application or installer HP Install Network Printer Wizard in accordance with the OS that we use.

Step two: Once the download is complete, do the installation to finish.

Step three: Run the HP Install Network Printer Application Wizard.
This application can we use on HP printers that are connected with UTP cable or Wireless.
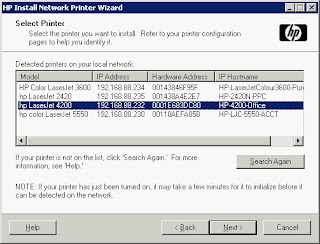
Network printer will then be detected we like the picture below.
After the type that will be installed printers we choose, then we would be asked to determine where this printer driver file.
Next we install to finish.
We can then take the Test Printing, or can also test the Printer Properties from the menu as usual.
The final step: Next we look at the list of printers installed on the PC we have been there and succeeded. Please take the Test to make sure the printer Printing we have been functioning as it should. And we can also setting this printer as printer sharing, depending on the willingness and ease that we want.
In my next article will also discuss how to create a setting that does not use the Network Printer Network Printer from HP. Tricks include making Port Printer (non USB / non LPT1), but the LPR port or an IP Printer Port